

Ready to go live with your new website?
Now that your new website is completed, and you're ready to make it go live for the world to see, you may not be sure what needs to be done for it to happen. This is where you'll find out how easy it is to go live with your new website.
Making your site live for the world requires only the 3 simple steps
as follows:
1) YOU publishing your site (just hit the blue PUBLISH or REPUBLISH button at the top right of your site)2) YOU or WE set up your domain in in your website settings3) YOU set up your domain through your domain host in your DNS settings (We can help you with this step).
1) Publishing your website
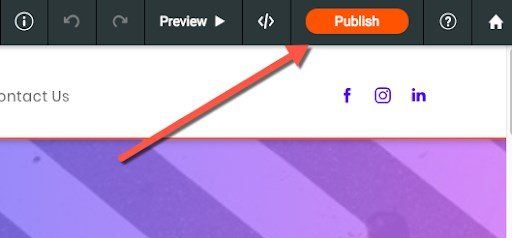
For your site to show up at any domain, we or you will first need to publish it. After we publish it the first time, you'll be able to re-publish the website after any changes that you make, in order for any future changes/updates to also go live. In your editor, locate and click on the “Publish” or "REPUBLISH" button at the top right, and that's it. The system then pushes all of your new changes and updates live for the world to see.
2) Setting up your domain in website SETTINGS
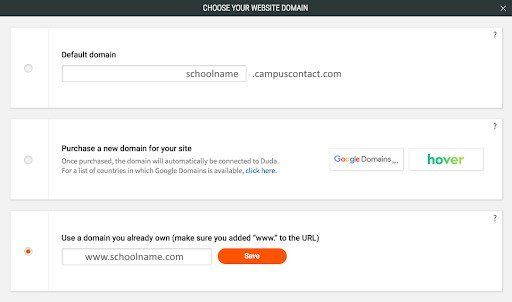
After a site is published for the very first time, we are prompted to select from one of three domain options.
Default Domain: This is a domain hosted by us which is usually not the best domain name for your website, since our domains may not accurately reflect your website or business name.
The URL will be a subdomain of civicsites.com, with your custom naming. You may use the original default domain (eg: business.civicsites.com) if you wish, and the site can still be seen and accessed anywhere in the world by any device.
You may also choose to use a domain that you already own, such as 'mybusiness.com', in which case it will be entered into the site settings, and will become the new primary domain name used to access your new website.
3) Setting up your Domain in your Domain Host
After setting up your domain in the settings area of your website, YOU
will need to set up your DNS settings through your domain host. In order to do this, you (or they) will need administrative access to the domain which you intend to use. In your domain host settings you will need to create 2 A Records
and 1 CNAME
record.
Note:
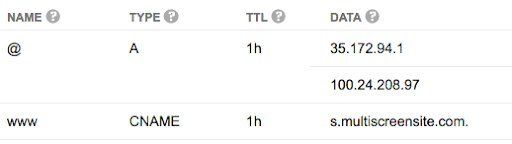
Some domain hosts will not allow you to set up multiple records for the @ domain. If this is the case for your domain host, then simply add one record for the @ domain and include both IP’s.
Here is an example from Google Domains, in which they use one A record with two IP's:
Here is an example from Godaddy, in which they use two A records (one for each IP):
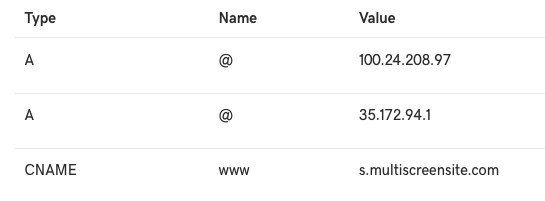
The Values you or your domain name host need to add for the CNAME and A Records are below:
CNAME
Host: www
Points to: s.multiscreensite.com
A Records
First A Record:
First A Record:
Host/Alias:
@
Target/Destination: 35.172.94.1
Second A Record:
Host/Alias: @
Target/Destination: 100.24.208.97

